Kombucha Brewing For Beginners: Complete Step-by-Step Guide


There's something magical about brewing your own kombucha at home. The satisfaction of watching a simple mixture of tea and sugar transform into a fizzy, probiotic-rich beverage through the power of fermentation is unmatched. Home brewing not only saves money compared to store-bought versions but also allows you to control every aspect of the process—from sweetness levels to flavor combinations.
If you've been purchasing kombucha from the store and wondering, "Could I make this myself?" the answer is a resounding yes! Kombucha brewing is surprisingly simple once you understand the basics. While the process might seem intimidating at first glance, thousands of home brewers worldwide have mastered this ancient art, and you can too.
This comprehensive guide will take you from complete beginner to confident home brewer. We'll cover everything from understanding the science behind fermentation to setting up your first batch, maintaining your SCOBY, and creating delicious flavor variations. Whether you're interested in brewing for health benefits, cost savings, or simply the joy of creating something with your own hands, this guide provides all the knowledge you need to succeed.
By the end of this article, you'll have the confidence to start your first batch and the knowledge to troubleshoot any challenges that arise. Let's embark on this exciting fermentation journey together!

- Understanding Kombucha Brewing Basics
- Getting Your First SCOBY
- Step-by-Step Brewing Process
- Step 1: Prepare Your Sweet Tea Base
- Step 2: Set Up Your Fermentation Vessel
- Step 3: First Fermentation Process
- Step 4: Testing For Doneness
- Second Fermentation For Flavor And Fizz
- Maintaining Your SCOBY Culture
- Safety And Sanitation
- Troubleshooting Common Issues
- Quick Takeaways
- Frequently Asked Questions
- 1. How Long Does It Take To Brew Kombucha At Home?
- 2. How Much Does It Cost To Brew Kombucha At Home?
- 3. Can I Use Flavored Tea Or Tea Bags With Oils?
- 4. What Should I Do If My Kombucha Tastes Too Sour?
- 5. Is It Normal For My Kombucha Culture To Change Appearance?
- Conclusion
- References
Understanding Kombucha Brewing Basics
Kombucha brewing combines ancient fermentation wisdom with modern understanding of microbiology, creating a process that transforms simple ingredients into complex, probiotic-rich beverages through controlled microbial activity.
The Science of Fermentation
Before diving into the practical aspects of brewing, it's essential to understand what's happening during kombucha fermentation. This knowledge will help you make informed decisions throughout the brewing process and troubleshoot any issues that arise.
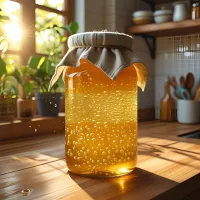
Kombucha fermentation is a complex process involving multiple microorganisms working in harmony. The SCOBY (Symbiotic Culture of Bacteria and Yeast) refers to the entire living culture - both the liquid starter tea and the pellicle (visible disk) that forms on top. This complete culture contains various strains of bacteria and yeast that each play specific roles:
Yeast Function: The yeast component breaks down sucrose (table sugar) into simpler sugars like glucose and fructose, then further converts these into ethanol and carbon dioxide. This process creates the slight alcohol content (typically less than 0.5%) and natural carbonation.
Bacterial Function: The bacterial strains, primarily Acetobacter and Gluconobacter, convert the alcohol produced by yeast into beneficial organic acids like acetic acid and gluconic acid. These acids give kombucha its characteristic tart flavor and help preserve the beverage.
Symbiotic Relationship: The bacteria and yeast work together in a mutually beneficial relationship. The yeast creates alcohol that feeds the bacteria, while the bacteria produce acids that help protect the culture from harmful microorganisms.
Essential Equipment and Ingredients
Success in kombucha brewing starts with having the right equipment and ingredients. Fortunately, the requirements are relatively simple and most items can be found in your kitchen or local stores.
Primary Equipment:
- Brewing Vessel: A wide-mouth glass jar (1-gallon capacity is ideal for beginners)
- Breathable Cover: Coffee filter, cheesecloth, or paper towel
- Elastic Band: To secure the cover
- Non-metal Strainer: Plastic or nylon mesh strainer
- Non-metal Stirring Utensil: Wooden or plastic spoon
- pH Strips or Digital pH Meter: For monitoring acidity levels
- Glass Bottles: For second fermentation (swing-top bottles work best)
Core Ingredients:
- SCOBY Culture: A healthy, active culture including starter tea (unflavored kombucha from a previous batch or store-bought) and optionally a pellicle
- Tea: Black, green, white, or oolong tea (avoid flavored teas with oils)
- Sugar: Pure cane sugar, white sugar, or organic sugar
- Water: Filtered or spring water (avoid chlorinated tap water)

Choosing Your Tea and Sugar
The foundation of great kombucha lies in selecting quality tea and sugar. These ingredients directly impact flavor, SCOBY health, and fermentation success.
Tea Selection Guidelines:
Black Tea: Provides robust flavor and essential nutrients for SCOBY health. Earl Grey, English Breakfast, and Ceylon work excellently.
Green Tea: Offers delicate flavor and high antioxidant content. Sencha, jasmine, and gunpowder green tea are popular choices.
White Tea: Creates subtle, light flavors but may require blending with black or green tea for optimal SCOBY nutrition.
Oolong Tea: Provides complex flavors and works well alone or blended with other teas.
Sugar Considerations:
White Sugar: The most reliable choice for beginners, providing consistent nutrition for the SCOBY.
Organic Cane Sugar: Works well and may provide slightly more complex flavors.
Raw Honey: Can be used but has antimicrobial properties that may stress the SCOBY.
Alternative Sugars: Coconut sugar, maple syrup, and agave can be experimented with but may affect SCOBY health over time.
Getting Your First SCOBY
Acquiring a healthy SCOBY represents the most critical step in beginning your kombucha brewing journey, requiring careful sourcing, quality assessment, and proper handling to ensure successful fermentation outcomes.
SCOBY Sources and Selection
Obtaining a healthy SCOBY is crucial for brewing success. Several options are available for acquiring your first culture:
From Friends or Local Brewers: The traditional method involves receiving a SCOBY from an experienced brewer. This often includes valuable mentorship and locally adapted cultures.
Online Suppliers: Reputable online retailers offer SCOBYs with detailed care instructions. Look for suppliers with positive reviews and guarantees.
Health Food Stores: Some local health food stores carry fresh SCOBYs or can special order them.
Growing Your Own: You can grow a SCOBY from a bottle of raw, unflavored store-bought kombucha, though this process takes 2-4 weeks.
Evaluating SCOBY Health
A healthy SCOBY (the complete culture including both starter tea and pellicle) exhibits specific characteristics that indicate its vitality and brewing potential:
Starter Tea Indicators:
- Clear to slightly cloudy appearance
- Tangy, vinegary aroma (pH 2.5-3.5)
- No off-odors or putrid smells
- May contain brown yeast strands (normal)
- Should taste tart and acidic
Pellicle Visual Indicators:
- Cream to light brown coloration
- Smooth, rubbery texture
- No fuzzy mold growth (green, black, or blue spots)
- May have brown stringy yeast formations attached
- Thickness can vary (thin pellicles are still healthy)
Warning Signs for the Complete Culture:
- Fuzzy mold growth on pellicle surface
- Foul, putrid odors from the liquid
- Extremely dark brown or black liquid coloration
- Slimy, disintegrating pellicle consistency
- Sweet smell indicating possible contamination
SCOBY Storage and Preparation
Before brewing, proper SCOBY culture storage and preparation ensure optimal fermentation results:
Short-term Storage (1-4 weeks):
Keep your SCOBY culture (starter tea with pellicle if you have one) in a glass container at room temperature, covered with a breathable cloth.
Long-term Storage (1-12 months):
Store in the refrigerator in a glass container with the starter tea. The culture will become dormant and can be reactivated when ready to brew.
Pre-brewing Preparation:
Remove the culture from storage and allow it to reach room temperature. Inspect the starter tea for health indicators - the pellicle can be rinsed gently with filtered water if necessary, but this isn't required.
Step-by-Step Brewing Process
Following a systematic brewing process ensures consistent results while building confidence and understanding that leads to successful long-term kombucha production and quality improvement over time.
Step 1: Prepare Your Sweet Tea Base
The sweet tea base provides nutrition for your SCOBY and forms the foundation of your kombucha.
Detailed Instructions:
-
Heat Water: Bring 4 cups of filtered water to a rolling boil in a non-reactive pot (stainless steel or glass).
-
Steep Tea: Remove from heat and add 4 tea bags or 4 teaspoons of loose tea. Steep for 10-15 minutes for stronger tea or 7-10 minutes for milder flavor.
-
Add Sugar: Remove tea bags/strain loose tea and immediately stir in ¾ cup of sugar until completely dissolved. The hot tea will dissolve sugar more effectively.
-
Cool to Room Temperature: Add 4 cups of cool filtered water to bring the total volume to 8 cups. Allow the mixture to cool completely to room temperature (68-78°F). Hot tea will damage the beneficial bacteria and yeast in your SCOBY culture.
-
Test Temperature: Ensure the tea is at room temperature before proceeding. This usually takes 1-2 hours.
Step 2: Set Up Your Fermentation Vessel
Proper setup creates an optimal environment for fermentation success.
Setup Process:
-
Clean Everything: Thoroughly clean your brewing vessel, utensils, and hands with hot soapy water. Avoid antibacterial soaps that could harm beneficial bacteria.
-
Add Sweet Tea: Pour the cooled sweet tea into your clean brewing vessel.
-
Add Your SCOBY Culture: Pour in 1-2 cups of starter tea from your SCOBY culture (kombucha from a previous batch or store-bought raw kombucha). This acidifies the environment and provides the beneficial bacteria and yeast needed for fermentation. If you have a pellicle, gently place it into the liquid using clean hands. The pellicle may float, sink, or sit sideways—all positions are normal and don't affect fermentation.
-
Cover Properly: Place a coffee filter, cheesecloth, or paper towel over the opening and secure with an elastic band. This allows airflow while protecting from contaminants.
Step 3: First Fermentation Process
The first fermentation is where the magic happens, transforming sweet tea into tangy kombucha.
Fermentation Guidelines:
Location Selection:
- Choose a spot with consistent temperature (68-78°F)
- Avoid direct sunlight
- Ensure good air circulation
- Keep away from other ferments or strong odors
Timeline Expectations:
- Days 1-3: Initial fermentation begins, slight sourness develops
- Days 4-7: Increased acidity, reduced sweetness
- Days 8-14: Continued fermentation, stronger flavor development
- Days 15+: Very tart, vinegary flavor (may be too strong for drinking)
Daily Monitoring:
- Visual inspection for mold or unusual growth
- Gentle taste testing after day 5
- pH monitoring (target: 2.5-3.5)
- Kombucha culture observation for health indicators
Step 4: Testing for Doneness
Determining when your kombucha is ready requires using multiple senses and measurements.
Testing Methods:
Taste Test: Use a clean straw or spoon to sample the kombucha. Look for a balance of sweet and tart flavors. Beginners often prefer stopping when it's still slightly sweet.
pH Testing: Use pH strips or a digital meter. Properly fermented kombucha should have a pH between 2.5-3.5.
Visual Cues: The liquid should be clearer than initially, with possible yeast strands or sediment at the bottom.
Aroma Check: Should smell tangy and slightly vinegary without any off-odors.
Time Guidelines: Most batches are ready between 7-14 days, depending on temperature and personal taste preferences.
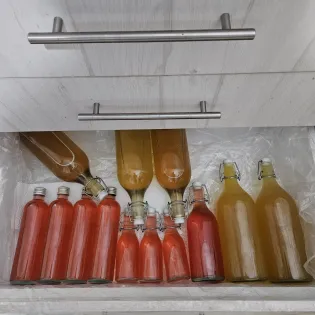
Second Fermentation for Flavor and Fizz
Second fermentation transforms plain kombucha into flavorful, carbonated beverages through controlled anaerobic fermentation that develops complex tastes and natural effervescence.
Understanding Second Fermentation
Second fermentation (F2) is an optional but highly recommended step that adds carbonation and allows for creative flavoring. This process involves transferring the first fermentation kombucha to sealed bottles with optional flavorings.
Benefits of Second Fermentation:
- Increased carbonation levels
- Flavor infusion opportunities
- Extended shelf life
- Improved mouthfeel and drinking experience
Scientific Process:
During F2, remaining sugars and any added sugars are converted to carbon dioxide in the sealed environment, creating natural carbonation. The anaerobic conditions also allow for unique flavor development.
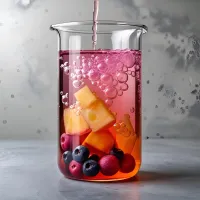
Flavoring Options and Techniques
The possibilities for flavoring kombucha are virtually endless. Here are proven flavor categories and techniques:
Fruit Flavoring:
- Fresh fruits: 2-3 tablespoons per 16 oz bottle
- Fruit juices: 1-2 tablespoons per 16 oz bottle
- Dried fruits: 1-2 tablespoons per 16 oz bottle
Herb and Spice Combinations:
- Fresh ginger: 1-2 teaspoons grated per bottle
- Cinnamon stick: 1 small piece per bottle
- Fresh herbs: 2-3 sprigs of mint, basil, or rosemary
- Spice blends: ¼ teaspoon per bottle
Popular Flavor Combinations:
- Ginger-lemon: Fresh ginger + lemon juice
- Berry-mint: Mixed berries + fresh mint
- Apple-cinnamon: Apple juice + cinnamon stick
- Tropical: Pineapple + coconut flakes
- Citrus-herbs: Orange zest + thyme
Second Fermentation Process
Equipment Needed:
- Glass bottles with tight-fitting lids (swing-top or screw-on)
- Funnel (optional but helpful)
- Fine-mesh strainer
Step-by-Step F2 Process:
-
Prepare Bottles: Clean and sanitize fermentation bottles thoroughly.
-
Add Flavorings: Place chosen flavorings directly into bottles before adding kombucha.
-
Strain and Pour: Strain first fermentation kombucha through a fine-mesh strainer to remove large particles and pour into bottles, leaving 1-2 inches of headspace.
-
Seal Tightly: Ensure lids are secured properly to create an anaerobic environment for carbonation.
-
Ferment at Room Temperature: Leave bottles at room temperature (68-78°F) for 2-4 days for carbonation development.
-
Test Carbonation: Carefully open one glass bottle to test carbonation levels.
-
Refrigerate: Once desired carbonation is achieved, refrigerate to slow fermentation and preserve carbonation.
Maintaining Your SCOBY Culture
SCOBY health directly impacts brewing success, requiring understanding of culture biology, growth patterns, and maintenance practices that ensure long-term viability and consistent fermentation performance.
Kombucha Culture Health and Growth
A healthy kombucha culture (both liquid and pellicle components) is essential for consistent brewing success. Understanding culture growth patterns and health indicators helps ensure long-term brewing success.
Normal Culture Behavior:
- Active fermentation in the starter tea (most important component)
- Gradual thickening of pellicle over successive brews (if present)
- Formation of new pellicle layers during fermentation
- Color variations in liquid from light brown to darker amber
- Development of yeast strands or "tentacles" in the liquid
Growth Patterns:
With each brew, a new pellicle layer may develop on top. The starter tea continues to develop beneficial bacteria and yeast colonies. Both components can be shared with friends or kept as backup cultures. A single kombucha culture can last indefinitely with proper care.
Feeding Requirements:
Kombucha cultures need regular nutrition from sweet tea to maintain health. Never leave a culture in plain water or without food for extended periods.
Kombucha Culture Hotel Setup
A culture hotel is a storage container for extra kombucha cultures and serves as backup insurance for your brewing operation.
Hotel Components:
- Large glass jar (half-gallon or larger)
- Sweet tea mixture (1:8 ratio of sugar to water)
- Starter tea and pellicles from previous brews (starter tea is essential)
- Breathable cover secured with elastic band
Maintenance Schedule:
- Feed monthly with fresh sweet tea to keep cultures active
- Remove oldest liquid and add fresh mixture
- Monitor liquid health and remove any compromised portions
- Maintain at room temperature for active hotels (pellicles may sink or float - both normal)
Troubleshooting Common Culture Issues
Issue: Pellicle sinks to bottom
Solution: Completely normal; pellicle position doesn't affect fermentation since the active culture is in the liquid
Issue: Starter tea turns very dark brown
Solution: Usually normal aging; monitor for other concerning signs like off-odors
Issue: White stringy formations in liquid
Solution: Normal yeast development; indicates healthy fermentation
Issue: Pellicle develops holes or tears
Solution: Normal occurrence; continue monitoring for other issues since the culture in the liquid remains active
Issue: Pellicle becomes very thin or doesn't form
Solution: Not a problem - the culture in the starter tea is what matters for fermentation; pellicle formation varies
Safety and Sanitation
Proper sanitation practices prevent contamination while maintaining the delicate balance of beneficial microorganisms that create healthy, safe kombucha through controlled fermentation processes.
Preventing Contamination
Maintaining proper sanitation prevents harmful bacteria and mold from compromising your kombucha.
Sanitation Best Practices:
Equipment Cleaning:
- Wash all equipment with hot, soapy water
- Rinse thoroughly to remove soap residue
- Air dry completely before use
- Avoid antibacterial soaps that could harm beneficial bacteria
Personal Hygiene:
- Wash hands thoroughly before handling your kombucha culture or finished kombucha
- Avoid touching the pellicle unnecessarily (the starter tea is the most important part)
- Use clean utensils for testing and stirring
Environmental Controls:
- Keep brewing area clean and free from dust
- Avoid brewing near cleaning chemicals or strong odors
- Ensure adequate ventilation without direct airflow on brewing vessel
Identifying and Handling Mold
Mold contamination is rare but serious when it occurs. Learning to identify mold versus normal culture formations is crucial.
Mold Characteristics:
- Fuzzy, raised growth on pellicle surface or liquid surface
- Colors: green, black, blue, or white fuzzy patches
- Grows in circular patterns
- Cannot be washed off
- Often accompanied by musty odors
Normal Culture Features (Not Mold):
- Brown spots or streaks on pellicle (normal aging)
- White stringy yeast formations in the liquid
- Smooth, rubbery pellicle texture variations
- Slight color changes in starter tea
Mold Response Protocol:
If mold is confirmed, discard the entire batch including all liquid and pellicle, then start fresh with a new culture. Do not attempt to save any portion of a moldy batch.
pH Monitoring and Safety
Proper pH levels ensure safe fermentation and prevent harmful bacteria growth.
Safe pH Ranges:
- Starting pH: 4.5-5.5 (with starter tea)
- Finished kombucha pH: 2.5-3.5
- Below 2.5: May be too acidic for enjoyable drinking
- Above 4.5: Risk of harmful bacteria growth
pH Testing Methods:
- Digital pH meters: Most accurate but require calibration
- pH test strips: Convenient and reasonably accurate
- Testing frequency: Check starting pH and test every few days during fermentation
Troubleshooting Common Issues
Understanding common brewing problems and their solutions builds confidence and expertise that transforms brewing challenges into learning opportunities for improved technique and better results.
Fermentation Problems
Slow or Stalled Fermentation:
Symptoms: Little to no flavor change after 10+ days
Causes: Low temperature, weak culture, insufficient SCOBY culture
Solutions:
- Move to warmer location (75-85°F ideal)
- Add more SCOBY culture (starter tea) to increase acidity and beneficial bacteria
- Check culture health and replace if necessary
Overly Sweet Kombucha:
Symptoms: Tastes like sweet tea after normal fermentation time
Causes: Cool temperatures, inactive culture, too much sugar
Solutions:
- Extend fermentation time
- Increase temperature
- Reduce sugar in next batch
Excessively Sour Kombucha:
Symptoms: Vinegar-like taste, very low pH
Causes: Over-fermentation, high temperatures
Solutions:
- Reduce fermentation time
- Lower temperature
- Blend with fresh sweet tea to dilute
Flavor and Carbonation Issues
Lack of Carbonation:
Symptoms: Flat kombucha after second fermentation
Causes: Poor bottle seal, insufficient sugars, cool temperatures
Solutions:
- Check bottle seal integrity
- Add small amount of sugar or fruit juice
- Ferment at warmer temperature
- Extend F2 time
Off-Flavors:
Symptoms: Metallic, musty, or unpleasant tastes
Causes: Contamination, poor water quality, stressed culture
Solutions:
- Use filtered water
- Improve sanitation practices
- Replace culture if persistent issues
Inconsistent Results:
Symptoms: Varying flavors and fermentation times between batches
Causes: Temperature fluctuations, varying ratios, different tea sources
Solutions:
- Maintain consistent temperature
- Standardize recipes and timing
- Use same tea and sugar sources
Advanced Troubleshooting
Alcohol Smell/Taste:
Symptoms: Strong alcohol aroma or taste
Causes: High yeast activity, warmer temperatures, longer fermentation
Solutions:
- Reduce fermentation time
- Lower temperature slightly
- Ensure proper air circulation
Weak Culture Performance:
Symptoms: Slow fermentation, reduced activity
Causes: Nutritional deficiencies, temperature stress, age
Solutions:
- Feed with black tea for nutrients (pellicle thickness doesn't indicate culture health)
- Maintain consistent temperature
- Consider replacing culture if very old
Your journey into the world of kombucha brewing is just beginning. With practice, patience, and passion, you'll soon be creating kombucha that rivals any commercial variety while enjoying the numerous benefits of this ancient fermented tea.
Quick Takeaways
• Start simple: Begin with basic black or green tea and white sugar before experimenting with alternative ingredients
• Temperature matters: Maintain 68-78°F for optimal fermentation; cooler slows process, warmer accelerates it
• Sanitation is crucial: Clean equipment and proper hygiene prevent contamination and ensure successful batches
• Patience pays off: First batches may take 10-14 days; experienced brewers can achieve 7-day cycles
• Culture care is essential: A healthy kombucha culture produces better kombucha; maintain with regular feeding and proper storage
• pH monitoring ensures safety: Target 2.5-3.5 pH in finished kombucha for safety and optimal flavor
• Second fermentation adds value: F2 creates carbonation and allows creative flavoring opportunities
Frequently Asked Questions
Beginner questions reflect common concerns and misconceptions that new brewers encounter when starting their kombucha journey, addressing practical implementation and troubleshooting needs.
1. How long does it take to brew kombucha at home?
First fermentation typically takes 7-14 days, depending on temperature and taste preferences. Second fermentation for carbonation takes an additional 2-4 days. Total time from start to finished product is usually 9-18 days. Warmer temperatures speed the process, while cooler temperatures slow it down.
2. How much does it cost to brew kombucha at home?
Home brewing is significantly cheaper than buying commercial kombucha. Initial setup costs $20-40 for equipment and culture. Each gallon of homemade kombucha costs approximately $2-3 in ingredients, compared to $12-16 for equivalent store-bought kombucha, representing 75-85% savings.
3. Can I use flavored tea or tea bags with oils?
Avoid flavored teas containing oils (like Earl Grey with bergamot oil) as they can damage your kombucha culture over time. Stick to pure teas: black, green, white, or oolong. If you want to use flavored teas, limit them to 25% of your tea blend and use plain tea for the majority.
4. What should I do if my kombucha tastes too sour?
Overly sour kombucha indicates over-fermentation. Reduce fermentation time for future batches, lower the temperature, or add more sweet tea to dilute the current batch. You can also blend sour kombucha with fresh sweet tea to create a milder flavor.
5. Is it normal for my kombucha culture to change appearance?
Yes, kombucha cultures naturally evolve over time. The pellicle may darken, develop brown spots, grow thicker, or form new layers. These changes are normal signs of a living culture. Only be concerned if you see fuzzy mold growth, which appears as green, blue, or black fuzzy patches on the surface.
Conclusion
Congratulations on taking the first steps into the fascinating world of kombucha brewing! What began as an ancient fermentation practice has evolved into a rewarding hobby that combines science, creativity, and health benefits. Through this comprehensive guide, you've learned the fundamentals of transforming simple tea and sugar into a probiotic-rich beverage using the remarkable symbiotic culture of bacteria and yeast.
The journey from beginner to confident kombucha brewer takes patience, practice, and a willingness to learn from each batch. Remember that every professional brewer started exactly where you are now—with curiosity, basic equipment, and a starter culture. Your first few batches might not be perfect, and that's completely normal. Each brewing cycle teaches valuable lessons about fermentation timing, flavor development, and culture maintenance.
The beauty of home brewing lies not just in the finished product, but in the process itself. You're participating in an ancient tradition while creating something uniquely yours. The satisfaction of sharing homemade kombucha with friends and family, the cost savings compared to store-bought varieties, and the creative freedom to experiment with flavors make this hobby incredibly rewarding.
As you continue your brewing journey, remember to stay curious and keep experimenting. Start with the foundational techniques covered in this guide, then gradually explore advanced methods, unique flavor combinations, and different tea varieties. Join online communities, connect with fellow brewers, and don't hesitate to ask questions when challenges arise.
Most importantly, trust the process and enjoy the journey. Your kombucha culture is now a living companion in your kitchen, ready to transform simple ingredients into healthful, delicious beverages for months and years to come. With proper care and attention, this culture can last indefinitely, creating countless batches of homemade kombucha while saving money and supporting your health goals.
Welcome to the wonderful world of kombucha brewing—may your vessels bubble happily and your flavors be ever delicious!
References
-
Crum, H., & LaGory, A. (2016). The Big Book of Kombucha: Brewing, Flavoring, and Enjoying the Health Benefits of Fermented Tea. Storey Publishing.
-
Greenwalt, C. J., Steinkraus, K. H., & Ledford, R. A. (2000). Kombucha, the fermented tea: microbiology, composition, and claimed health effects. Journal of Food Protection, 63(7), 976-981.
-
Marsh, A. J., O'Sullivan, O., Hill, C., Ross, R. P., & Cotter, P. D. (2014). Sequence-based analysis of the bacterial and fungal compositions of multiple kombucha (tea fungus) samples. Food Microbiology, 38, 171-178.
-
Teoh, A. L., Heard, G., & Cox, J. (2004). Yeast ecology of Kombucha fermentation. International Journal of Food Microbiology, 95(2), 119-126.
-
Watawana, M. I., Jayawardena, N., Gunawardhana, C. B., & Waisundara, V. Y. (2015). Health, wellness, and safety aspects of the consumption of kombucha. Journal of Chemistry, 2015, 1-11.
Ready to start your kombucha brewing adventure? Share your brewing plans, questions, or success stories in the comments below! What flavors are you most excited to try? If you're already brewing, what tips would you share with fellow beginners? Don't forget to share this comprehensive guide with friends who might be interested in starting their own kombucha journey. Follow us for more detailed brewing tutorials, troubleshooting guides, and creative recipe ideas!